8/30/07

Boot XP from your usb pen drive


Requirements:
1) Windows XP CD or Windows XP Setup Information
2) USB Pen Drive Minimum of 1 GB (disk space necessary 256 MB or less
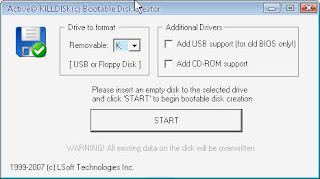
3) BART PE builder software

PROCEDURE:

1) Run PE Builder (pebuilder.exe). When you start PE Builder for the first time it will ask if you agree with the license agreement

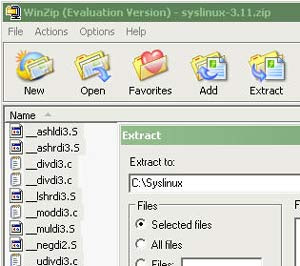
2)Now PE Builder will ask to search for windows installation files. If you don't have your windows XP setup/installation files on your system you must insert the original Microsoft Windows XP installation/setup CD at this point

The files you have at c:\windows are not installation files. They are your already installed files!Click "yes" to start searching. PE Builder will now search all fixed- and CD-Rom drives for Windows installation files. This will take some time. When more than one valid location is found, a dialog will appear where you can select which location you want to use.

3)Now select the medium to which xp is to be copied as your usb drive

4)Hit build

5)Now REBOOT your system n' go to BIOS setup(press del/f2 while booting)

Set primary boot device as your usb ...

YEAH.......................

How To Run Linux on a USB Drive


Things Needed to Begin
USB Storage Device - (256mb or larger recommended using USB 2.0)
PC that can boot from a USB Device (check your BIOS or your User Manual)
Damn Small Linux (DSL) Distro {AVAILABLE AT Digit dvdAUG 2007}
Syslinux 3.11
Bootable Disk Creator for Free version of KillDisk
1. Formatting The USB Storage Device

1) Insert your USB Storage Device into an empty USB slot on your PC
2) Run Active@ killdisk bootable floppy/usb creator

3) set your drive to farmat as ur usb drive (mine is K:)
2 Extracting Necessary Files

1) Download and Extract the Damn Small Linux distro (dsl-embedded.zip) to your USB device using Win-Zip or any extraction software.

2) Download and Extract all the files from syslinux-3.11 to a folder named Syslinux on your primary hard drive (mine is C:)

3) Go to the Run Menu (Click Start> Run) and open the Command Prompt by entering cmd and pressing Enter (or Click OK)
4) At the Command Prompt type cd c:\syslinux\win32 (substitute c: for the drive letter of your hard drive) and Press Enter

5)Type syslinux.exe -f F: (F: reprents the drive letter of my USB Device. Yours may be different. GET THIS RIGHT). Press Enter
6)Type exit to close the Command Prompt


3 Booting to Linux
1) Keep your USB Device plugged in and Reboot your PC.

2) Enter your BIOS setup (usually by pressing F2 or DEL) and set your Boot order to boot from the USB Device First. Exit your BIOS and Save the Changes. Since there are MANY different BIOS you must figure out on your own if your PC supports booting from USB.

If all process go on as mentioned u will get a dsl bootscreen askin to reboot


YEAH................................................................

8/12/07

Download all the images in a gallery


First get these things


Here is the trick


Most of the sites save the images of a particular gallery with a common name followed by a number for example image1, image2 , image3, and so on, first we are going to get the image url and then use a “PHP” program to produce a html page which contains links to all the images in the gallery.

How to get the url of the image..?

You should have mozilla firefox if you don’t have it you can download it for free using the referal button given above. open the gallery which you want to download in mozilla . Now open the frist and last images of the gallery , right click on the image and select view image now you will get the url of the image in the address bar now you can get the total number of images in the galley from the name of the last image and the common name used. The name of the image may be in either of the three forms


image1,image2,.......image10,image11.....
image01,image02,.......image10,image11....
image001,image002,......image010,image011.....
image0001,image0002,......image0010,image0011.....


I'm going to explain this tick using this image url as an example http://idlebrain.com/movie/photogallery/genelia3/images/genelia8.jpg
STEP 1:open the first and last image from the gallery.
STEP 2:Right click on the image and select view image as shown in the figure below


STEP 3:Once you get the url of the image copy the url of the image(the one shown in the image below) excluding the number,in our case it would be http://idlebrain.com/movie/photogallery/genelia3/images/genelia


STEP 4:Enter the url you got in step three,the number of the image from where you want to start downloading and the number of image upto which you want to download in the form below and then click on GO this generates a page containing the links to all the images. Right click on any of the link's given in that page and select download all with MassDownloader,or Download all with DAP


now pdf books will talk

download coolspeak

  • Now install cool speak
  • Run it
  • Open your pdf book
  • select the portion do you want to read
  • right click > copy to clipboard ....

yeah ur e-book is saying story to u>>>>>>>>>>>>>>

8/8/07

How To Do a Repair Install of XP

  • Make sure the BIOS is set to boot from the CD (put the CD above the HD in the boot order)
  • Insert the XP CD and boot to it
  • When you see " To setup Windows XP now, press ENTER", go ahead and press ENTER
  • You will now see an option to repair Windows by pressing "R". Do not select this option - it will only take you to the Recovery Console which is not what we want to do. Instead, choose to continue the installation
  • When you see the license agreement, press F8 to agree
  • On the next screen make sure your current XP installation is selected and then press "R" to repair XP
  • At this point XP will begin to install on top of itself, replacing damaged, missing or altered system files. Follow the instructions on the remaining screens to complete the Repair Install. It will look very much like a normal (new) OS installation.

If all goes well your repaired XP installation will remain iintact, keeping your personalized settings and installed programs as they originally were. Remember, choose the second repair option, not the first.

Fast Shutdown and/or Restart From Quick Launch Buttons

This tip will enable you to create buttons in your quick launch toolbar to quickly and easily shut down and/or restart your computer.

  1. Right click on your desktop, scroll to new..... shortcut
  2. In the location line, for shutdown type; shutdown -s -t 0 ie: shutdown(space)-s(space)-t(space)number zero
  3. Name the shortcut "Shut Down PC" or whatever u want
  4. The new shortcut is now sitting on your desktop, right click on it and go to properties, then click on "change icon". Click OK, then pick a suitable icon, there is a red "off button" icon available, then click apply and ok.
  5. Now drag the icon from your desktop into the quick launch toolbar, resize the toolbar so all the buttons are visible, then delete the shortcut from your desktop.


To create a restart button the location line should read shutdown -r -t 0 name it restart pc and give it a suitable icon for restart.
Now you can shut down or restart your pc in 1 mouse click without having to go through the startup menu.

8/6/07

Shutdown on right click on my computer

Do the following Steps:
Open Notepad.
Select and copy the following text and paste it in notepad.


reg add "HKCR\CLSID\{20D04FE0-3AEA-1069-A2D8-08002B30309D}\shell\[Shutdown]\command" /ve /t REG_EXPAND_SZ /d "shutdown -s -f -t 00" /f

Click the File --> Save As.... from notepad menu.
Now type the file name as abc.bat and select file type as All Files.
Save the file.
Now double click on the saved file.
Refresh the desktop.
Right click on my computer a new option will be added

serials for all your windows applications no need of net

search for keys for all your windows applications in your local machine [no need of net]
cant' belive that your pc to become a database of about 65,000 serials "its true"

download Serials2000 in an upgraded version

download updates (updates available as weekly & half yearly )

Now insatall & run serials 2000
Now go to file>update database >now browse the folder where you downloaded the update packs ... update weekly or half yearly nJoy ...

8/4/07

Change alignment of Start Menu panel

This is a customizing tip. If you have noticed, START MENU PANEL has all the entries aligned to left. Well that's not a cause of concern but may be you are one of those who want it to be the other way, say you want it to align to right.
This can be done by a quick registry tweak. In regedit, navigate to [HKEY_CURRENT_USER\Control Panel\Desktop] and look for key "MenuDropAlignment".
Set its value to 1 to align the menu entry to right or if you did not like the idea of entries aligned to right, set it back to 0 for align back to left which is the Default XP behavior

Secure your computer: Enable Advanced File System Security Options

This will further secure your windows explorer and not really a performance tweak.
Open registry by going to START-RUN and entering regedit.
Navigate to [HKEY_LOCAL_MACHINE\SYSTEM\CurrentControlSet\Control\Lsa] . In this look for value of "forceguest". If available, its default value would be 0. Set its value to 1. This would enables Windows XP logic for advanced permissions.

Twitter Delicious Facebook Digg Stumbleupon Favorites More

 
Design by Free WordPress Themes | Bloggerized by Lasantha - Premium Blogger Themes | Best CD Rates