9/15/11

Download Windows 8 Developer Preview

The new Windows 8 Start Screen
(Credit: Microsoft)

Those of you interested in taking the current flavor of Windows 8 for a spin can now download and install the Developer Preview edition.

Being demoed at Microsoft's Build conference this week, the Developer Preview is a prebeta version showing off the operating system at its current stage. Though technically designed for developers, no registration is required, so anyone can download and install it.
DOWNLOAD

The Windows 8 Preview is being offered in three different packages--a 64-bit version with various developer tools, a 64-bit version of just the operating system, and a 32-bit version of the OS.

All three come as ISO files--image files of the contents of a CD or DVD. Since each of the packages is several gigabytes in size, you'll need a DVD if you want to burn the files to a disc.

In Windows 7, you can burn the ISO file to a DVD by double-clicking it to open the Windows Disc Image Burner. For older operating systems, you can use a tool such as ISO Recorder to burn the file. Alternatively, you can use such utilities as Virtual CloneDrive or Daemon Tools to "mount" the ISO file as a drive, eliminating the need to burn it onto a disc.

Since this is a prebeta version, you'll want to install the OS on a spare PC or in a virtual environment so that it doesn't interfere with your production or work machine.

Those of you who want to know what you're getting into before you attempt to install the Developer Preview can check out a hands-on early look at Windows 8 from CNET's Seth Rosenblatt.

What's next after the Developer Preview?

Speaking at the Build conference yesterday, Steven Sinofsky, senior vice president of Microsoft's Windows division, confirmed earlier reports that Windows 8 will next segue into one beta version, followed by one Release Candidate. Assuming all goes well, we can then expect the final RTM (release to manufacturing) edition sometime after that.

Sinofsky didn't reveal a specific timeframe for the beta or Release Candidate. However, the company has been expected to launch the beta at the 2012 Consumer Electronics Show in January,is according to WinRumors.

NOTE:This is only a re sharing of post found at cnet tech blog.Click  here for the orginal.

How to install Turbo C++ on Windows 7 64bit

This tutorial is dedicated to all those guys who messed up while trying to install C++ in Windows 7

1. Install the software DOSBox ver 0.73 : download here
2. Create a folder,for example „Turbo“ (c:\Turbo\)
3. Download and extract TC into the Turbo folder (c:\Turbo\): download here
4. Run the DOSBox 0.73 from the icon located on the desktop:
step 1 How to install Turbo C++ on Windows 7 64bit

5. Type the following commands at the command prompt [Z]: mount d c:\Turbo\ [The folder TC is present inside the folder Turbo]
Now you should get a message which says: Drive D is mounted as a local directory c:\Turbo\
step 2 How to install Turbo C++ on Windows 7 64bit
6. Type d: to shift to d:
step 3 How to install Turbo C++ on Windows 7 64bit
7. Next follow the commands below: cd tc
cd bin
tc or tc.exe [This starts you the Turbo C++ 3.0]
step 4 How to install Turbo C++ on Windows 7 64bit
8. In the Turbo C++ goto Options>Directories> Change the source of TC to the source directory [D] ( i.e. virtual D: refers to original c:\Turbo\ . So make the path change to something like D:\TC\include and D:\TC\lib respectively )

How to start TurboC++ in the DOSBox automatically:

You can save yourself some time by having DOSBox automatically mount your folders and start TurboC++:
For DOSBox versions older then 0.73 browse into program installation folder and open the dosbox.conf file in any text editor. For version 0.73 go to Start Menu and click on “Configuration” and then “Edit Configuration“. Then scroll down to the very end, and add the lines which you want to automatically execute when DOSBox starts.
Automatically mount and start Turbo C++3.0 in DOSBox ver 0.73:
step 5 How to install Turbo C++ on Windows 7 64bit
Scroll down to the very end, and add the lines:
step 6 How to install Turbo C++ on Windows 7 64bit
Those commands will be executed automatically when DOSBox starts!
Please note: Full screen: Alt and Enter
When you exit from the DosBox [precisely when u unmount the virtual drive where Turbo C++ 3.0 has been mounted] all the files you have saved or made changes in Turbo C++ 3.0 will be copied into the source directory(The directory which contains TC folder)
Don’t use shortcut keys to perform operations in TC because they might be a shortcut key for DOSBOX also . Eg : Ctrl+F9 will exit DOSBOX rather running the code .

CLICK HERE FOR MY VIDEO TUTORIAL ON THIS ARTICLE

9/7/11

Encrypt your entire hard disk for free

You may think that setting windows logon password will keep all your data safe . For hackers its not a big deal to break windows passwords.Tools like trinity rescue kit,konboot etc will break your windows password within seconds.So if you are professional or something like that and you may have critical data in your hard drive its not fully safe with windows login password or with bitlocker(A free tool avalable with windows 7 ultimate).Once the identity thieves access all your personal data then he can make your life like hell.So in this post I will show you how to encrypt your entire hard disk for free.We will be using a powerful ,Open Source program called “TrueCrypt” for this.In OpenSource world there are many powerful tools like TrueCrypt is available.So do a visit at SourceForge.net and feel the power of OpenSource.

Lets start the process.Download TrueCrypt from www.truecrypt.org .Run it.You will get 2 options asking wheather to download or to just extract the files.I prefer to install.


Now run TrueCrypt from the desktop.
1.Click on “Create New Volume” and Next


2.Select “Encrypt the system partition or entire system drive” and Next


3.Select the Type of System Encryption as “Normal” and Next

4.Select the Area to Encrypt as “Encrypt the whole drive” and Next


5.We are not using any networking stuffs here so select No for the Host Protected Area and proceed

6.Next window will ask whether your system is single boot or multi boot .Since I have only one OS.I selected “Single -boot” and Next.

7.Now select the Encryption Options
·         Select your favourite encryption algorithm if you are aware of it or simply select AES
·         Select HASH algorithm also , default is RIPEMD-160
·         Click next to proceed

8.Here is the important part .Enter a strong password,which may be the combination of uppercase,lowercase,numbers etc.Truecrypt will needs a password of minimum length of 20 characters,otherwise it will display an alert saying  small passwords can be cracked easily blah blah.


9.Next step TrueCrypt will create random keys.Here you are supposed to move your mouse inside the “current pool content”  filed for a long time inorder to generate a more randomized key.Click Next.

10.Next  window will show your header key and master key .Nothing to do here .Just click Next to continue.


11.Its the time to create the rescue disc if anything goes wrong.Browse and select where to save the ISO image.It will open your windows image burner.Just burn it and keep it safe.If you are a netbook user you have to use a tool called Wincdemu for creating the rescue disk (Just google it.)

12.Next screen you will get a confirmation screen saying “Rescue disc verified” and Next.
13.Select the wipe mode as “None(Fastest)” and Next.
14.Next window will ask you for “System Encryption Pretest” ,ie,a test run.Click Test.
15.Your system will be rebooted and you will get a prompt  asking to enter your password.Just enter password carefully and hit enter.Your windows will get loaded.

16. Once you logged in to the system.TrueCrypt automatically pops up saying “Pretest completed” and just click “Encrypt”.And this will start the encryption process.Normally it will take a hour + to complete the encryption process.The encrypting speed will depend upon your harddisk speed and processor speed.
17.Once you get the “Encryption completed” message .Its all done

You had successfully created your encrypted hard disk.And it will be pretty harder for the hackers to get into your system.But you must be aware that , nothing is impossible for a hacker.He hacks everything. Someday some hacker will say TrueCrypt is not  safe anymore.So stay updated in the tech field.


9/6/11

Improve Windows 7 security by changing RDP port

The Remote Desktop utility in windows systems are built for remote assistance in case any system problems or other kind of situation that the normal user can handle.In some countries the technical support is provided with the help of this technology.Since this service uses a common port in all systems it will be easy for the hacker to enter into your system once you enabled Remote Desktop Assistance.So in this tutorial I will show you how to change this port number and get protected from hackers.
Its a 3 step process

1.Run regedit from the start menu to open the Registry Editor. Navigate to HKEY_LOCAL_MACHINE, SYSTEM, CurrentControlSet, Control, Terminal Server, WinStations and RDP_Tcp. Find the PortNumber dword anddouble -click.

2.Your default port number will be 3389.Just change it to a value between 1025 and 65535.
3.Reboot System.
The next time you connect to your system with RDP you are going to have to provide the new port number. Be sure that you write it down in a safe place so you do not forget. From the Remote Desktop client, append a colon after the ip address or after the host name and enter the port number after the colon. This will set everything up to operate normally.

NOTE:Windows users who do not use Remote Desktop can alternatively disable the service completely to close down access completely. This is done with a click on the Start button and the selection of Control Panel.
There you need to open the System Control Panel applet and select Remote Settings from the options.Uncheck “allow remote assistance connections to this computer” and activate “don’t allow connections to this computer” under Remote De

9/5/11

Download Torrents via HTTP (Use any download managers for High Speed Downloads)

Bittorrent offers a very popular way of downloading files from the Internet, or even a local network. The protocol is however very dependent on the seeders, that is the users or servers the complete files are distributed from. Users can speed up downloading and seeding of files with so called seedboxes, which are dedicated servers that usually have a much larger throughput than the lines of the clients.
Torrific offers an interesting alternative to using seedboxes or downloading torrents directly to a local computer service. The free service can be used to create direct HTTP downloads of torrents. It basically works like this. The user adds a torrent file to the system. Torrific then uses its server to download the torrent, and make it available for download to the user of its service.
There are a few benefits of this, with the two most prominent ones the following: HTTP downloads are usually a lot faster than downloads from Bittorrent, and that’s true even with the added time that the downloads take before they are ready and available at Torrific.
The second advantage is that the user’s IP address does not appear in the P2P network at all. Torrific does all that, and it will be very interesting to see how they handle downloads of copyrighted media.

The download progress of each torrent that is added to the service is displayed on the user’s profile page. Having said that it should be noted that user accounts are mandatory but easy to setup and without verification whatsoever.
Torrents can either be added directly by pointing the service to a torrent url, or by using a keyword search, which makes use of a custom Google search form. It usually is faster to locate the torrent directly though, especially if the user has a few favorite sites for torrent downloads.
Email notifications can be configured, which dispatch an email whenever a torrent has been downloaded completely by the torrent downloading service.
Some torrents are available instantly, which is the case if another Torrific member already requested it and if it still resides on the servers of the torrent downloading service. The developers state that files are usually stored for a limited period of time, due to storage limitations. This currently seems to be less than a week. The oldest torrents expire first to make room for new torrent requests.
torrific
Premium accounts are available, which offer benefits like no wait time for large torrent downloads. The service is currently in alpha, and offers unlimited downloads for free users. It is likely that this is going to change over time. Everything else would simply be unreasonable, considering that the service has to pay for the bandwidth used by its users and the downloads of the torrents.

8/23/11

How to create a Driver Auto Installer


If you’ve ever re-installed Windows, you’ll know how time consuming it can be.
This is partly because you have to install numerous device drivers (if you can find all your hardware installation disks, that is).
With Driver Genius you can avoid this hassle by creating a driver auto-installer that will install all your drivers at once.
So, let’s get on with it…

Choose which drivers to backup

Fire up Driver Genius and click on Backup.
Now, the first thing to do is choose which drivers to include on the backup file.
choose which drivers to backup in Driver Genius
Selecting which drivers to backup.
I suggest selecting all of them.
Click Next

Choose the backup type

Now choose the type of backup.
select the auto-installer option in Driver Genius
Selecting the backup type and location.
Select Auto-Installer Archive from the drop down menu.
Also choose a location.
If you’re intending to re-install Windows you’ll want to save it (or copy it) to another drive or disk, otherwise it’ll get overwritten.
My auto-installer file is approximately 72MB, so it’ll easily fit on a CD-ROM…
… but for now I’ve chosen to save it to my slave drive.
Click Next
Driver Genius will now backup your drivers.
This process took about 45 minutes on my computer (mind you, it’s no spring chicken, so yours may not take as long).
Click Finish at the bottom of the confirmation screen to return to the Driver Genius main screen.

Check the auto-installer works

Navigate your way to the drive or folder you saved the auto-installer to and double click on the exe file to launch it.
You should see a screen something like this:
Driver Genius's driver Auto-Installer application
The Driver Genius driver installation program.
And that’s it. You’re done.
Next time you re-install Windows you can sit back and relax while Driver Genius does the tedious part.

NOTE:This post originally found on http://www.utilitysoftwarereviews.com . So gimme credits ony for sharing.. SHARING IS WHAT CARING.. 

7/25/11

Transform Windows 7 into mac Os X Lion


Are you a mac lover and want to transform your windows 7 to mac Os X Lion.Lion is the latest version of mac os that has released recently.Here is a wonderful transformation pack called Lion Skin Pack  by hameddanger which transforms your windows 7 to just look like mac.You don't have to do any manual operations here.Just download the package , Install it and you have done. But you need custopacks to be installed in your system for enabling the mac skin.Download custopacks from HERE.

Snapshot
Download Lion Skin Pack

Want to install and try mac os x snow leopard along with your Windows ? Yea my upcomming tutorial will show you how to install mac os X snowloeapard inside your windows using virtualBox.


7/23/11

How to crack Internet Downlaod Manager

Hi geekz !!! Internet Download Manager aKa IDM is the best download mangers available now.It is not a free software and almost all the cracks available for IDM's contain malwares and sometimes IDM will throw you out for registering using fake serial. So in this article I will show you how to register or crack your IDM for lifetime license.You don't need any special cracks or patches or any such kinda things for this.Just follow the steps.
  • Download the latest version of IDM from HERE.
  • Install and Run it,navigate to Registration > Registration.
  • It will ask you to enter your Name , Email ID and a Serial key.
  • Provide name , Email Id and in the serial key field, Use any of the serial keys provided below.
RLDGN-OV9WU-5W589-6VZH1
HUDWE-UO689-6D27B-YM28M

UK3DV-E0MNW-MLQYX-GENA1

398ND-QNAGY-CMMZU-ZPI39

GZLJY-X50S3-0S20D-NFRF9

W3J5U-8U66N-D0B9M-54SLM

EC0Q6-QN7UH-5S3JB-YZMEK

UVQW0-X54FE-QW35Q-SNZF5

FJJTJ-J0FLF-QCVBK-A287M
It will  show an error reporting that you had registered using a fake serial key (Some times it accepts the key).Now just quit IDM n navigate to the following directory.

C:\windows\system32\drivers\etc\

There you can see a file called "hosts".We have to edit this file.But in windows 7 we have to take ownership of the file before editing any system file.So click here to see how to take the ownership of a file in windows 7.After taking ownership just right click on hosts file and open it using notepad.Now add the following lines to the end of the file.

127.0.0.1    tonec.com
127.0.0.1    www.tonec.com
127.0.0.1    registeridm.com
127.0.0.1    www.registeridm.com
127.0.0.1    secure.registeridm.com
127.0.0.1    internetdownloadmanager.com
127.0.0.1    www.internetdownloadmanager.com
127.0.0.1    secure.internetdownloadmanager.com
127.0.0.1    mirror.internetdownloadmanager.com
127.0.0.1    mirror2.internetdownloadmanager.com 

Edited Hosts file
Adding this will disable all the services that will check your serial number and other information.That is it will not allow you to connect with the IDM server.Now go to Help > About IDM , you can see that the software has been licensed with your name.
IDM registered with my name
But you can't update your IDM after this.If you try to Update.It will show an error as follows.
Error while you try to update
 This error occurs because all the online services has been disabled by the edited hosts file.So if you want to update it,simple open the hosts file and remove the extra things that we added and update IDM.After update sometimes it will show an error saying your IDM is registered with fake serial key blah blah. Just follow the above procedure to crack it again.If you don't like doing so there is another one method .
JUST BUY THE ORIGINAL SOFTWARE!


7/21/11

Secure your laptop or Mobile from being stolen !


Hey geekz wazz up??? Want to be a smart techie who can trace your stolen gadgets as like in Hollywood movies.Yea it is possible.There is an opensource program called "prey" that can be installed in your system and will help you to trace your stolen laptop or mobile for certain extend.Prey is a silent but deadly application which will run in the background and will collect information about the device like its location,IP,who is using it and even capture the crook's picture if your device is having a webcam. Along with installing the prey agent in your system you have to register your device in their website. Once if your device is being stolen.Just go to their website and report it as stolen and it will collect the information about the device if its connected to any network (Works only if connected to network.. sounds awhhh !!! Yea thats why i specified as "for certain extend" above )But there is a WiFi auto connect option.If that feature is enabled then prey will automatically connect to nearest WiFi hotspot .I personally tested this software and its pretty cool.

Follow the below instructions to know how to download and configure Prey!
  • Download prey HERE. (Available for Windows/Mac/Linux and its now available for mobiles working on iOS/android Platform only.Symbian version is coming soon )
  • Install the application and run it.
  • It will ask for a confirmation since you are running for the first time.
  • In the next window select "Set Reporting Method"

  • Then "Prey + Control Panel"
  • Then "New USer"


  • Fill the necessary fields.Specify the device type "Portable/Desktop"
  • Now "Create"

Agent configuration part is over now.Now check your inbox for prey activation mail.Just activate your prey account and log in to it :).You can see your device name over there.Just click on it you will be directed to a device setting page.Configure all those things which you want to activate once its reported as stolen.


Just Save the settings and get out of it.Prey will run silently in your system.
How to activate tracing?
  • just go to www.preyproject.com
  • Log in to your account
  • Select the device
  • You can see a toggle button asking "Missing" . Change it to yes
  • Set the time interval and frequency n start the battle to bust the thief.
You can add upto 3 devices each of 10 reports ! If you want more just pay some cash !

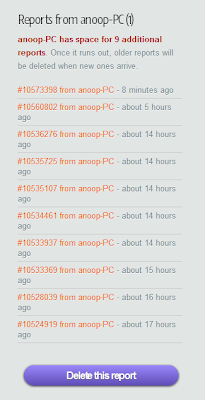
Here are some reports that I had received.


Hope you enjoyed this stuff !!!

7/20/11

Extract Facebook saved passwords from browser

Here is a simple but powerful application called "Facebook Password Extractor" , which can be used to extract facebook passwords stored in web browsers.Here is some features of "FPE"


  • Shows Facebook passwords cached or stored in a variety of browsers
  • Reveals stored login and password information instantly in just a click
  • Supports all versions of Microsoft Internet Explorer, including IE7, IE8 and IE9
  • Supports all versions of Mozilla Firefox including Firefox 4
  • Supports all versions of Opera including Opera 11
  • Supports all versions of Google Chrome including Chrome 11
  • Supports all versions of Apple Safari including Safari 5
  • Reveals Facebook logins and passwords for all supported browsers
  • Beats enhanced security model of Internet Explorer 7, 8 and 9'
Visit their website to read about more features.

You can download the application from the below link.


Now run the application.Accept the agreement.


It will scan for facebook accounts and passwords and reveal if anything found.This can be used for recovering the password or can be used to hack your friends password stored in his PC ! That's the naughty part.You got the tool now now just what to do with it is left to you.
Enjoy :)

Twitter Delicious Facebook Digg Stumbleupon Favorites More

 
Design by Free WordPress Themes | Bloggerized by Lasantha - Premium Blogger Themes | Best CD Rates