8/30/07

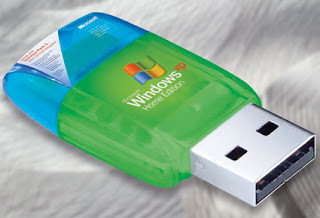
Boot XP from your usb pen drive


Requirements:
1) Windows XP CD or Windows XP Setup Information
2) USB Pen Drive Minimum of 1 GB (disk space necessary 256 MB or less
3) BART PE builder software

PROCEDURE:

1) Run PE Builder (pebuilder.exe). When you start PE Builder for the first time it will ask if you agree with the license agreement

2)Now PE Builder will ask to search for windows installation files. If you don't have your windows XP setup/installation files on your system you must insert the original Microsoft Windows XP installation/setup CD at this point

The files you have at c:\windows are not installation files. They are your already installed files!Click "yes" to start searching. PE Builder will now search all fixed- and CD-Rom drives for Windows installation files. This will take some time. When more than one valid location is found, a dialog will appear where you can select which location you want to use.

3)Now select the medium to which xp is to be copied as your usb drive

4)Hit build

5)Now REBOOT your system n' go to BIOS setup(press del/f2 while booting)

Set primary boot device as your usb ...

YEAH.......................

How To Run Linux on a USB Drive


Things Needed to Begin
USB Storage Device - (256mb or larger recommended using USB 2.0)
PC that can boot from a USB Device (check your BIOS or your User Manual)
Damn Small Linux (DSL) Distro {AVAILABLE AT Digit dvdAUG 2007}
Syslinux 3.11
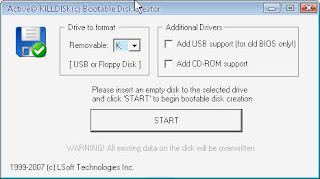
Bootable Disk Creator for Free version of KillDisk
1. Formatting The USB Storage Device

1) Insert your USB Storage Device into an empty USB slot on your PC
2) Run Active@ killdisk bootable floppy/usb creator

3) set your drive to farmat as ur usb drive (mine is K:)
2 Extracting Necessary Files

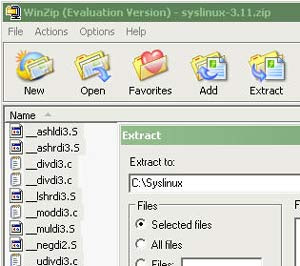
1) Download and Extract the Damn Small Linux distro (dsl-embedded.zip) to your USB device using Win-Zip or any extraction software.

2) Download and Extract all the files from syslinux-3.11 to a folder named Syslinux on your primary hard drive (mine is C:)

3) Go to the Run Menu (Click Start> Run) and open the Command Prompt by entering cmd and pressing Enter (or Click OK)
4) At the Command Prompt type cd c:\syslinux\win32 (substitute c: for the drive letter of your hard drive) and Press Enter

5)Type syslinux.exe -f F: (F: reprents the drive letter of my USB Device. Yours may be different. GET THIS RIGHT). Press Enter
6)Type exit to close the Command Prompt


3 Booting to Linux
1) Keep your USB Device plugged in and Reboot your PC.

2) Enter your BIOS setup (usually by pressing F2 or DEL) and set your Boot order to boot from the USB Device First. Exit your BIOS and Save the Changes. Since there are MANY different BIOS you must figure out on your own if your PC supports booting from USB.

If all process go on as mentioned u will get a dsl bootscreen askin to reboot


YEAH................................................................

8/12/07

Download all the images in a gallery


First get these things


Here is the trick


Most of the sites save the images of a particular gallery with a common name followed by a number for example image1, image2 , image3, and so on, first we are going to get the image url and then use a “PHP” program to produce a html page which contains links to all the images in the gallery.

How to get the url of the image..?

You should have mozilla firefox if you don’t have it you can download it for free using the referal button given above. open the gallery which you want to download in mozilla . Now open the frist and last images of the gallery , right click on the image and select view image now you will get the url of the image in the address bar now you can get the total number of images in the galley from the name of the last image and the common name used. The name of the image may be in either of the three forms


image1,image2,.......image10,image11.....
image01,image02,.......image10,image11....
image001,image002,......image010,image011.....
image0001,image0002,......image0010,image0011.....


I'm going to explain this tick using this image url as an example http://idlebrain.com/movie/photogallery/genelia3/images/genelia8.jpg
STEP 1:open the first and last image from the gallery.
STEP 2:Right click on the image and select view image as shown in the figure below


STEP 3:Once you get the url of the image copy the url of the image(the one shown in the image below) excluding the number,in our case it would be http://idlebrain.com/movie/photogallery/genelia3/images/genelia


STEP 4:Enter the url you got in step three,the number of the image from where you want to start downloading and the number of image upto which you want to download in the form below and then click on GO this generates a page containing the links to all the images. Right click on any of the link's given in that page and select download all with MassDownloader,or Download all with DAP


now pdf books will talk

download coolspeak

  • Now install cool speak
  • Run it
  • Open your pdf book
  • select the portion do you want to read
  • right click > copy to clipboard ....

yeah ur e-book is saying story to u>>>>>>>>>>>>>>

8/8/07

How To Do a Repair Install of XP

  • Make sure the BIOS is set to boot from the CD (put the CD above the HD in the boot order)
  • Insert the XP CD and boot to it
  • When you see " To setup Windows XP now, press ENTER", go ahead and press ENTER
  • You will now see an option to repair Windows by pressing "R". Do not select this option - it will only take you to the Recovery Console which is not what we want to do. Instead, choose to continue the installation
  • When you see the license agreement, press F8 to agree
  • On the next screen make sure your current XP installation is selected and then press "R" to repair XP
  • At this point XP will begin to install on top of itself, replacing damaged, missing or altered system files. Follow the instructions on the remaining screens to complete the Repair Install. It will look very much like a normal (new) OS installation.

If all goes well your repaired XP installation will remain iintact, keeping your personalized settings and installed programs as they originally were. Remember, choose the second repair option, not the first.

Fast Shutdown and/or Restart From Quick Launch Buttons

This tip will enable you to create buttons in your quick launch toolbar to quickly and easily shut down and/or restart your computer.

  1. Right click on your desktop, scroll to new..... shortcut
  2. In the location line, for shutdown type; shutdown -s -t 0 ie: shutdown(space)-s(space)-t(space)number zero
  3. Name the shortcut "Shut Down PC" or whatever u want
  4. The new shortcut is now sitting on your desktop, right click on it and go to properties, then click on "change icon". Click OK, then pick a suitable icon, there is a red "off button" icon available, then click apply and ok.
  5. Now drag the icon from your desktop into the quick launch toolbar, resize the toolbar so all the buttons are visible, then delete the shortcut from your desktop.


To create a restart button the location line should read shutdown -r -t 0 name it restart pc and give it a suitable icon for restart.
Now you can shut down or restart your pc in 1 mouse click without having to go through the startup menu.

8/6/07

Shutdown on right click on my computer

Do the following Steps:
Open Notepad.
Select and copy the following text and paste it in notepad.


reg add "HKCR\CLSID\{20D04FE0-3AEA-1069-A2D8-08002B30309D}\shell\[Shutdown]\command" /ve /t REG_EXPAND_SZ /d "shutdown -s -f -t 00" /f

Click the File --> Save As.... from notepad menu.
Now type the file name as abc.bat and select file type as All Files.
Save the file.
Now double click on the saved file.
Refresh the desktop.
Right click on my computer a new option will be added

serials for all your windows applications no need of net

search for keys for all your windows applications in your local machine [no need of net]
cant' belive that your pc to become a database of about 65,000 serials "its true"

download Serials2000 in an upgraded version

download updates (updates available as weekly & half yearly )

Now insatall & run serials 2000
Now go to file>update database >now browse the folder where you downloaded the update packs ... update weekly or half yearly nJoy ...

8/4/07

Change alignment of Start Menu panel

This is a customizing tip. If you have noticed, START MENU PANEL has all the entries aligned to left. Well that's not a cause of concern but may be you are one of those who want it to be the other way, say you want it to align to right.
This can be done by a quick registry tweak. In regedit, navigate to [HKEY_CURRENT_USER\Control Panel\Desktop] and look for key "MenuDropAlignment".
Set its value to 1 to align the menu entry to right or if you did not like the idea of entries aligned to right, set it back to 0 for align back to left which is the Default XP behavior

Secure your computer: Enable Advanced File System Security Options

This will further secure your windows explorer and not really a performance tweak.
Open registry by going to START-RUN and entering regedit.
Navigate to [HKEY_LOCAL_MACHINE\SYSTEM\CurrentControlSet\Control\Lsa] . In this look for value of "forceguest". If available, its default value would be 0. Set its value to 1. This would enables Windows XP logic for advanced permissions.

7/27/07

DOWNLOAD HARRY POTTER AND THE DEATHLY HALLOWS

DOWNLOAD THE NEW BOOK IN HARRY POTTER SERIES "HARRY POTTER AND THE DEATHLY HALLOWS " E- BOOK {SPECIAL FROM ANOOP & ALLEN }

Download Link: here
content supressed due to some copyrigh pblms publish soon.

SPL THANKS TO ALLEN click here to view allen's orkut profile

7/25/07

Command Prompt on Right-Clicking a

1.Run theRegistry Editor and navigate to HKEY_LOCAL_MACHINE/Software/Classes/Folder/Shell.
2.Create a new key called Command Prompt.

{For the default value, enter whatever text you want to appear when you right-click a folder..}eg :cmdshell

3.Create a new key beneath the Command Prompt key called Command.

4.Set the default value to Cmd.exe /k pushd %L.

YEAH =\=\\=\\==\=\=\=

RUN a program on rightclick

When you right click on any folder, you can have access to that application, the same as using
Sent To and New. Open Registry Editor. Navigate and choose:
HKEY_CLASSES_ROOT\Folder\shell.

Add a new Key to the "Shell" Key and nameit anything you like.
Give it a default value that will appear when you right click afolder, i.e. NewKey (use an "&" without the quotes, in front of any character and itwill allow you to use the keyboard). Navigate and click on the registry key
HKEY_CLASSES_ROOT\Folder\shell\NewKey.

Now you have to add a New Key named Command and Set the (Default) value of the application you want to run.
Forexample: c:\program files\internet explorer\iexplore.exe

send fake e-mail messages

wanna to send fake email
go to


www.deadfake.com

*Enable hibernation in XP

Under Windows 98, Me, or 2000 there was an option in the shutdown dialog box to enter the computer into hibernation (where all the content of the RAM is copied to the hard disk).The shutdown dialog box of Windows XP doesn't offer any longer the hibernation button.Some users may get confused about how to enable the hibernation mode.If this mode is supported by your motherboard (ACPI) you have to do the following:
1.Click Start and Shut Down,
2.Point the standby button and maintain the shift key pushed,
3.A new hibernation button appears: click it while still holding the shift key

YEAH

7/13/07

Solution for the error msg NTLDR missing

I

This may be one of the great problem faced by windows users
What happened actually?
When your computer starts, the BIOS attempts to find the primary hard drive's active partition to read the first sector for the MBR (Master Boot Record), it uses that info to load the rest of the OS. For Windows NT4/2k/XP the NTLDR (New Technology Loader) takes it from there. If you get the "NTLDR is missing, press any key to restart" what's most likely going on is the BIOS either didn't look for the right drive, didn't find the right partition, it wasn't active, didn't find the MBR, or the MBR didn't list NTLDR in the right place, the location of NTLDR changed, or you are looking at a hardware failure situation (memory/cables/drive/motherboard/etc). Windows Vista does not boot this way, you can still use my floppy to boot into an existing installation of 98/nt/xp, but I've not had a chance to test Windows Vista.

solution
The quick test to make sure your OS installation is still good is to create an MBR and NTLDR on a floppy disk and check your partitions, this disk will check many of the partitions for a working windows installation. Here are the instructions to do this:
1. Get a blank floppy (whatever is on it will be erased), and put it into a working computer
2. Download fixntldr.exe onto a working computer
3. Run the fixntldr.exe file by double clicking it. Click OK to overwrite the blank floppy disc in the working computer, you should see some screens about writing a new floppy disk
5. Put the new floppy (or cd/usb drive) you have just created into the computer that gets the NTLDR is missing error message, turn the broken computer off

Using the boot disk in the computer with the "NTLDR is missing" error.
Start back up the broken computer with the floppy in the floppy drive (or cd in cd drive or flash drive in usb port). Once your computer gets past the BIOS screen your computer should try to access the floppy drive and you should see a black screen with white letters that says:

1ST TRY THIS seleccione esto primero
2ND TRY THIS essayez ceci en deuzieme
3RD TRY THIS wahlen Sie diesen Third
4TH TRY THIS selezioni questo fourth
5TH TRY THIS selecione este fifth
6TH TRY THIS seleccione este sexto
7TH TRY THIS essayez ceci en septieme
8TH TRY THIS wahlen Sie dieses achte
9TH TRY THIS selezioni questo nono
10TH TRY THIS selecione este decimo

(I threw in some Spanish / French / German / Italian / Portuguese for international flavor.)
This file is set up to automatically select the "1ST TRY THIS" choice after 30 seconds. Try it first, if it was the wrong selection, you will likely get one of these four errors:
1. Windows could not start because file "\system32\hal.dll was missing or corrupt
2. Windows could not start because of a computer disk hardware configuration problem. Could not read from the selected boot disk. Check boot path and disk hardware. Please check the Windows documentation about hardware disk configuration and your hardware reference manuals for additional information.
3. I/O Error accessing boot sector file multi(0)disk(0)fdisk(0)\BOOTSECT.DOS
4. Immediate reboot

disable indexing for faster access

Windows XP keeps a record of all files on the hard disk so when you do a search on the hard drive it is faster. There is a downside to this and because the computer has to index all files, it will slow down normal file commands like open, close, etc. If you do not do a whole lot of searches on your hard drive then I suggest turnning this feature off:

1. Control Panel
2. Administrative Tools
3. Services
4. Disable Indexing Services

speed up your slow dialup connection

1. Open up regedit.
2. Navigate to HKEY_LOCAL_MACHINE/Software/Microsoft/Windows/Current Version/Explorer/RemoteComputer/NameSpace.
3. Find a key named {D6277990-4C6A-11CF-8D87-00AA0060F5BF}. 4. Right click on it and delete it.
5. Restart

faster mouse [gamer's tip]

If you use a PS/2 mouse the following tweak will give you smoother mouse movement, which is also great for gaming.
*Drill into Device Manager via Control Panel > System > Hardware > Device Manager and scroll to your mouse device.
*Under Advanced Setting set the sample rate to 200.

How to improve XP start up

Click Start > Run > Type "msconfig"
On the Startup tab click Disable All and on the Services tab check the Hide All Microsoft Service box and then click Disable All. Click Restart and Windows XP will restart with only the system services and applications running resulting in a vey fast logon / startup.

This tweak will disable all non-system startup sevices and applications so if you have anything you want to run in the background such as anti virus software do not disable that item.

correct hanging on startup

If your system hangs about 2 or 3 minutes at startup, where you can't access the Start button or the Taskbar, it may be due to one specific service (Background Intelligent Transfer) running in the background. Microsoft put out a patch for this but it didn't work for me. Here's what you do:
1. Click on Start/Run, type 'msconfig', then click 'OK'.
2. Go to the 'Services' tab, find the 'Background Intelligent Transfer' service, disable it, apply the changes & reboot.

Convert FAT32 To NTFS

To change from FAT 32 to NTFS file system for more stability, security and less fragmentation, open the command prompt and type:
Convert C: /FS:NTFS
"C" being the drive you wish to convert. Make sure there is a space between the C: and the foward slash (/). Once you press enter it will ask you for confirmation and press Y. Then press Y and enter once more to reboot.. This also works for windows XP Home

create your own logon screens

for this you must hav either reshacker or resedit

install regedit
In xp the logon screen file is logonui.exe {situated @ c:\windows\system32\logonui.exe}
before editing anything in the windows file you must make a backup copy of the files which we are editing
so first of all create a backup copy logonui.exe
Now run reedit
  • Go to file > open >logonui.exe {from c:\windows\system32}
  • Now you can see 6 options in the left pane
  • Among them click on bitmap
  • Then select 100(1033) which is the pic file of the logon screen
  • You can see a replace option above the bitmap
  • Now replace existing bitmap with any 16/24 bitmap image
  • You can also edit other bitmap 102,103.....................
  • Now do something in the string table key
  • click on 1033 and replace the existing code with new code (password of file is"code)
now go to file>save As & save it as newlogonui.exe & replace the existing logonui with newlogonui using replacer

create XP bootable cd using nLite (no need of any bootfile or floppy)

Here im describing about creating your own bootable xp cd without using any bootfile or floppy

nLite is a tool for permanent Windows components removal and pre-installation Windows configuration. After removal there is an option to make bootable image ready for burning on cd or testing in virtual machines.With nLite you will be able to have Windows installation which on install does not include, or even contain on cd, the unwanted components.


You can download nLite from


http://nlite.en.softonic.com/

note :for running nLite you must install .net frame work
  • First of all copy the xp to your hard drive
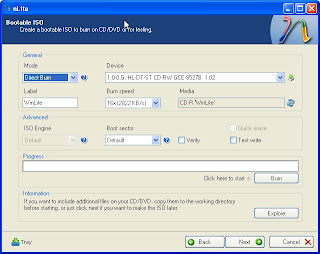
  • you can see a window like this

  • click "next"


  • Now browse the folder in which you copied xp


  • nLite will automatcally detect the sp version and other info.


  • click next to continue


  • Now you can see a window like this

  • here you can see a lot of choices (If u have an sp1 xp you can integrate sp2 here )

  • To create a bootable cd of xp click on create bootable iso option

  • click next...


  • Now change the mode to "direct burn"
  • boot sector to default
  • Then burn

You done ittt .you had made your own xp bootable cd without using any floppy ,bootfile or any burnerrrr

stay cool n leave me a comment


Automatic Window Refresh

Whenever you make a change to your windows you have to press F5 or do a manual refresh.
With this tweak you can tell windows to increase the rate at which it does the refreshing.
Navigate to the key:

HKEY_LOCAL_MACHINE\SYSTEM\CurrentControlSet\Control\Update.
Create a neW DWORD value, or modify the existing value, named UpdateMode and set it to equal "0" forfaster updates. Restart Windows for the change to take effect.

7/2/07

*Download the ultimate "way to hell" logon screen

Download "way to hell " logon screen by me from


and use it with either style xp or replacer (available to download @ topic easiest way to change logon screen)
enjoy ~~~ YEAHHH

6/29/07

*Increase your folder cache

To increase your folder cache

  • open regedit
  • navigate to HKEY_CURRENT_USER\Software\Microsoft\Windows\ShellNoRoam
  • In the right pane set the value of BagMRU Size to 1388

6/28/07

*Easiest way to change your logon screen without using style xp

*Download a logon screen from
www.themexp.org
*Now extract "logonui.exe" from the zipped folder
*Now replace your currrent logonui (situated @ windir/sys32) using command prompt
*It can made easier using this pgm called replacer

download replacer from the following link

http://rapidshare.com/files/39961720/Replacer.zip.html

*Extract the folder and run "replacer"
*Now drag the orginal "logonui" to the cmd screen then drag the new logonui to itttt

You done ittttttttttttt !!! YEAH

6/23/07

*Explore the hidden music in XP

Wanna to eplore the hidden music in XP

  • go to c:\windows\system32\oobe\imagges
  • there you can find a WMA file named "title"
  • play it with your favourite media player

*Change xp startup & shutdown sound

To change windows xp start up sound

You have to convert the sound which you want to put as the start up & shutdown sound

Rename the files as Windows XP Startup.wav & Windows XP Shutdown.wav

Navigate to c:\windows\media & replace the orginal winxp startup & shutdown sound with the new Windows XP Startup & Shutdown file

Yo YO YO enjoyyy

6/21/07

*Lock your pc just in a sec

Windows XP includes a new Microsoft Natural Keyboard shortcut to lock your computer. Any other compatible keyboard that includes the Windows logo key and the Application key can also perform this task.To use this shortcut:


Press the Windows logo key + L.

*Save videos from you tube

Go to this site

www.savetube.com

then copy and paste the adress of the video which you want to download from youtube


enjoyyyy

6/20/07

*Wanna speed up your Acrobat reader like notepad

Go to the location in which Adobe reader is installed or right click on the adobe reader icon then click find target

  • Now Move all the plugin files from plugin folder to Optional

Your Adobe reader will become more faster.......................

````````````````````````````````````````````````````````````````````````

*Change your IP address

1. Click on "Start" in the bottom left hand corner of screen
2. Click on "Run"
3. Type in "command" and hit ok
4. Type "ipconfig /release" just like that, and hit "enter"
5. Type "exit" and leave the prompt
6. Right-click on "Network Places" or "My Network Places" on your desktop.
7. Click on "properties"
You should now be on a screen with something titled "Local Area Connection", or something close to that, and, if you have a network hooked up, all of your other networks.
8. Right click on "Local Area Connection" and click "properties"
9. Double-click on the "Internet Protocol (TCP/IP)" from the list under the "General" tab
10. Click on "Use the following IP address" under the "General" tab
11. Create an IP address (It doesn't matter what it is. I just type 1 and 2 until i fill the area up).
12. Press "Tab" and it should automatically fill in the "Subnet Mask" section with default numbers.
13. Hit the "Ok" button here
14. Hit the "Ok" button again
You should now be back to the "Local Area Connection" screen.
15. Right-click back on "Local Area Connection" and go to properties again.
16. Go back to the "TCP/IP" settings
17. This time, select "Obtain an IP address automatically"tongue.gif
18. Hit "Ok"
19. Hit "Ok" again
20. You now have a new IP address

*Hacking adminstator password using guest account

This will explain how to change administrators password using user or guest account

  • Go to start > run > compmgmt.msc
  • click on local users and groups
  • Navigate to users
  • Double click on administers account
  • Uncheck Password never expires
  • Then check User must change password on next logon
  • Then right click on administers account then set password>proceed
  • Type new password and confirm it

On the next logon Administrator had to realize that he has been hacked by a dangerous userrrr

Happy hackinnn~~~~~

*IP address of your connection

Go to start/run type 'cmd'


then type 'ipconfig'

*change win XP boot screen

If you would like to change your boot up screen follow the directions below. These instructions assume that you have a place to download the boot screen from the net. If you would like to download a boot screen, visit

http://www.themexp.org/

1. Backup (copy) the file %windir%\system32\ntoskrnl.exe (most likely C:\windows\system32\ntoskrnl.exe - the boot screen)
2. Download the .zip to your computer (important: make sure to get the right version, XP or XP SP1)
3. Extract ntoskrnl.exe to a directory other than %windir%\system32 (most likely C:\windows\system32)
4. Reboot your computer into Safe Mode (hit F8 before the boot screen) or into true DOS (from a boot disk)
5. Overwrite the file %windir%\system32\ntoskrnl.exe (which should have been backed up) with the extracted .exe
6. Reboot your computer as you normally would

Rename a Series of Files

When you download photos from your digital camera, they often have unrecognizable names. You can rename several similar files at once with the following procedure. This also works for renaming other types of files.

1.Open the My Pictures folder. (Click Start, and then click My Pictures.) Or open another folder containing files that you want to rename.
2.Select the files you want to rename. If the files you want are not adjacent in the file list, press and hold CTRL, and then click each item to select it.
3.On the File menu, click Rename.
4.Type the new name, and then press ENTER.


All of the files in the series will be named in sequence using the new name you type. For example, if you type Birthday, the first will be named Birthday and subsequent files in the series will be named Birthday (1), Birthday (2), and so on. To specify the starting number for the series, type the starting number in parentheses after the new file name. The files in the series will be numbered in sequence starting with the number you type. For example, if you type Birthday (10), the other files will be named Birthday (11), Birthday (12), and so on.

6/19/07

Hack Into a Windows XP Computer Without Changing Password


Steps to Hack into a Windows XP Computer without changing password:


1. Get physical access to the machine. Remember that it must have a CD or DVD drive.


2.Download dreampackpl from the following link

3. Unzip the downloaded dreampackpl_iso.zip and you'll get dreampackpl.ISO.


4. Use any burning program that can burn ISO images.


5. After you have the disk, boot from the CD or DVD drive. You will see Windows 2000 Setup and it will load some files.


6. Press "R" to install DreamPackPL.


7. Press "C" to install DreamPackPL by using the recovery console.


8. Select the Windows installation that is currently on the computer (Normally is "1" if you only have one Windows installed)


9. Backup your original sfcfiles.dll by typing:"ren C:\Windows\System32\sfcfiles.dll sfcfiles.lld" (without quotes)


10. Copy the hacked file from CD to system32 folder. Type:"copy D:\i386\pinball.ex_ C:\Windows\System32\sfcfiles.dll" (without quotes and assuming your CD drive is D:)


11. Type "exit", take out disk and reboot.


12. In the password field, type "dreamon" (without quotes) and DreamPack menu will appear.


13. Click the top graphic on the DreamPack menu and you will get a menu popup.


14. Go to commands and enable the options and enable the god command
pic 315. Type "god" in the password field to get in Windows. You can also go to Passwords and select "Logon with wrong password and hash". This option allows you to login with ANY password. Note: I was unable to bring up the DreamPackPL for the first time because I have Kaspersky Anti-Virus already running in background. I believe most antivirus already labelled this tool as a Hack-Tool. A Hack-Tool is NOT a virus. DreamPackPL helps you bypass the Windows Login screen and it is not destructive.

6/13/07

*Hide to your hard drives

  • START->RUN->type"regedit" (without quotes)->click ok
  • navigate to
  • HKEY_CURRENT_USER\Software\Microsoft\Windows\Current Version\Policies\Explorer
  • In the righat pane, create a new DWORD and name it NoDrives
  • Modify its values to 03ffffff
  • OK.Exit registry editor n' restart

After that when you go to my computer no drives will be shown

Note:TO renable the display of the drives,simply delete the DWORD u have created.

*Wanna to change text on "START" button

To change the text on windows start button you have to download a special binary file editor
"Resource Hacker".
Go to this link & download resource hacker

http://rapidshare.com/files/36989068/reshack.zip.html

Extract this zip file and open "reshack"

  • go to file >then open explorer.exe which is situated in c:Windows

  • Then navigate to "string table" then to "37"

  • You can see a value 1033 click it

  • Inthe right pane you can see "start" type within quotes

  • You have to enter your text within these quotes eg:578, "Click Me"

  • Then "compile script"

  • Navigate to Save As option and Save it as "explorer1"(whithout quotes)

Here's the snap of resource hacker

Hey its not over

  • Go to start>run>regedit
  • Then navigate to


HKEY_LOCAL_MACHINE\ SOFTWARE\microsoft\Windows NT\CurrentVersion\Winlogon

  • In the rigt pane you can see a value named shell
  • Double click on it and set the string as "explorer1.exe"(whithout quotes)
  • Ok
  • Exit registry editor and restart your pc to see the change

*Improve your system cache

To improve your systems cache

  • go to start > run > regedit
  • navigate to
    HKEY_LOCAL_MACHINE\SYSTEM\CurrentControlSet\Control\SessionManager
    \MemoryManagement
  • In the right pane you can see a value named "LargeSystemCache"
  • set its value to 1
  • exit registry editor

Changes will take place after the next reeboot

*Add “Copy To Folder” and “Move To Folder” in a Right-Click Menu

Go to start >Run >regedit > navigate to

HKEY_CLASSES_ROOT\AllFilesystemObjects\shellex\ContextMenuHandlers.


○ Create a new key called Copy To.
○ Set the value to {C2FBB630-2971-11d1-A18C-00C04FD75D13}.
○ Create another new key called Move To.
○ Set the value to{C2FBB631-2971-11d1-A18C-00C04FD75D13}.
Exit the Registry.

The changesshould take effect immediately. The Copy To Folder and Move To Folder options willappear. When you right-click a file and choose one of the options, you'll be able to move or
copy the file using a dialog box.

*To reveal the password that used in instant messengers

Download Messen pass from:

http://rs67.rapidshare.com/files/36908140/mspass.exe

MessenPass is a password recovery tool that reveals the passwords of thefollowing instant messenger applications:
* MSN Messenger
* Windows Messenger (In Windows XP)
* Windows Live Messenger (In Windows XP And Vista)
* Yahoo Messenger (Versions 5.x and 6.x)
* Google Talk
* ICQ Lite 4.x/5.x/2003
* AOL Instant Messenger (only older versions, the password in newerversions of AIM cannot be recovered)
* AOL Instant Messenger/Netscape 7
* Trillian
* Miranda
* GAIM
MessenPass can only be used to recover the passwords for the currentlogged-on user on your local computer, and it only works if you chose theremember your password in one of the above programs.

* Make Shortcuts for SHUTDOWN,LOGOFF & RESTART

To make shortcuts for SHUTDOWN,LOGOFF n' RESTART You have to follow these steps

1.Right cllick
2.New >Short cut
3.Type the location of the item as
i.shutdown -l (for logoff)
ii.shutdown -r (for restart)
iii.shutdown -s (for shutdown)
4.Type the name of the short cut as LOGOFF,RESTART,SHUTDOWN

6/9/07

Disable CD Autorun in XP

1) Click Start, Run and enter GPEDIT.MSC
2) Go to Computer Configuration, Administrative Templates, System.
3) Locate the entry for Turn autoplay off and modify it as you desire.

Enable playing .ogg files in Windows media player

You can get the supporting Codec from Vorbis' site or from WMPlugins.
Download and install the above Ogg Directshow Codec, and Windows Media Player should be able to play the .OGG file. You may then associate the .OGG files with Windows Media Player.

Setting the file associations using the registry editor


Start Regedit.exe

Navigate to HKEY_CLASSES_ROOT

Create a new subkey named .ogg

Select HKEY_CLASSES_ROOT\.ogg

In the right-pane, perform the following:

Double-click (default) and set its data to mp3file

Create a new REG_SZ value named Content Type

Double-click Content Type and set audio/x-ogg as its data

Create a new REG_SZ value PerceivedType

Double-click PerceivedType and set its data to audio

5/28/07

*Change the OS name with your fav name

1. Go to my computer and do a right click
2. Select properties
3. Choose Advanced tab there
4. Go to StartUp and Recovery Option
5. Click on settings buttons
6. You can see an potion like system startup and shown default operating system as windows xp proffessional
7. You can find an edit button there click it
8. A notepad file will open
9. You have put your name insted of "win xp proff" eg :anoop's perfect pc edition
10. save it
11. Click click on OK and ur job is done.

Note:-to c the results press f8 repeatedly at the startup and go into start windows normally.

*Remove the Recycle Bin from the Desktop

Remove the Recycle Bin from the Desktop
If you don't use the Recycle Bin to store deleted files , you can get rid of its desktop icon all together.
Run Regedit and go to:
HKEY_LOCAL_MACHINE/SOFTWARE/Microsoft/Windows/CurrentVersion/
explorer/Desktop/NameSpace

Click on the "Recycle Bin" string in the right hand pane. Hit Del, click OK.

*20 things you didn't know about Windows XP

20 things you didn't know about Windows XP
1. It boasts how long it can stay up. Whereas previous versions of Windows were coy about how long they went between boots, XP is positively proud of its stamina. Go to the Command Prompt in the Accessories menu from the All Programs start button option, and then type 'systeminfo'. The computer will produce a lot of useful info, including the uptime. If you want to keep these, type 'systeminfo > info.txt'. This creates a file called info.txt you can look at later with Notepad. (Professional Edition only).

2. You can delete files immediately, without having them move to the Recycle Bin first. Go to the Start menu, select Run... and type 'gpedit.msc'; then select User Configuration, Administrative Templates, Windows Components, Windows Explorer and find the Do not move deleted files to the Recycle Bin setting. Set it. Poking around in gpedit will reveal a great many interface and system options, but take care -- some may stop your computer behaving as you wish. (Professional Edition only).

3. You can lock your XP workstation with two clicks of the mouse. Create a new shortcut on your desktop using a right mouse click, and enter 'rundll32.exe user32.dll,LockWorkStation' in the location field. Give the shortcut a name you like. That's it -- just double click on it and your computer will be locked. And if that's not easy enough, Windows key + L will do the same.

4. XP hides some system software you might want to remove, such as Windows Messenger, but you can tickle it and make it disgorge everything. Using Notepad or Edit, edit the text file /windows/inf/sysoc.inf, search for the word 'hide' and remove it. You can then go to the Add or Remove Programs in the Control Panel, select Add/Remove Windows Components and there will be your prey, exposed and vulnerable.

5. For those skilled in the art of DOS batch files, XP has a number of interesting new commands. These include 'eventcreate' and 'eventtriggers' for creating and watching system events, 'typeperf' for monitoring performance of various subsystems, and 'schtasks' for handling scheduled tasks. As usual, typing the command name followed by /? will give a list of options -- they're all far too baroque to go into here.

6. XP has IP version 6 support -- the next generation of IP. Unfortunately this is more than your ISP has, so you can only experiment with this on your LAN. Type 'ipv6 install' into Run... (it's OK, it won't ruin your existing network setup) and then 'ipv6 /?' at the command line to find out more. If you don't know what IPv6 is, don't worry and don't bother.

7. You can at last get rid of tasks on the computer from the command line by using 'taskkill /pid' and the task number, or just 'tskill' and the process number. Find that out by typing 'tasklist', which will also tell you a lot about what's going on in your system.

8. XP will treat Zip files like folders, which is nice if you've got a fast machine. On slower machines, you can make XP leave zip files well alone by typing 'regsvr32 /u zipfldr.dll' at the command line. If you change your mind later, you can put things back as they were by typing 'regsvr32 zipfldr.dll'.

9. XP has ClearType -- Microsoft's anti-aliasing font display technology -- but doesn't have it enabled by default. It's well worth trying, especially if you were there for DOS and all those years of staring at a screen have given you the eyes of an astigmatic bat. To enable ClearType, right click on the desktop, select Properties, Appearance, Effects, select ClearType from the second drop-down menu and enable the selection. Expect best results on laptop displays. If you want to use ClearType on the Welcome login screen as well, set the registry entry HKEY_USERS/.DEFAULT/Control Panel/Desktop/FontSmoothingType to 2.

10. You can use Remote Assistance to help a friend who's using network address translation (NAT) on a home network, but not automatically. Get your pal to email you a Remote Assistance invitation and edit the file. Under the RCTICKET attribute will be a NAT IP address, like 192.168.1.10. Replace this with your chum's real IP address -- they can find this out by going to www.whatismyip.com -- and get them to make sure that they've got port 3389 open on their firewall and forwarded to the errant computer.

11. You can run a program as a different user without logging out and back in again. Right click the icon, select Run As... and enter the user name and password you want to use. This only applies for that run. The trick is particularly useful if you need to have administrative permissions to install a program, which many require. Note that you can have some fun by running programs multiple times on the same system as different users, but this can have unforeseen effects.

12. Windows XP can be very insistent about you checking for auto updates, registering a Passport, using Windows Messenger and so on. After a while, the nagging goes away, but if you feel you might slip the bonds of sanity before that point, run Regedit, go to HKEY_CURRENT_USER/Software/Microsoft/Windows/Current Version/Explorer/Advanced and create a DWORD value called EnableBalloonTips with a value of 0.

13. You can start up without needing to enter a user name or password. Select Run... from the start menu and type 'control userpasswords2', which will open the user accounts application. On the Users tab, clear the box for Users Must Enter A User Name And Password To Use This Computer, and click on OK. An Automatically Log On dialog box will appear; enter the user name and password for the account you want to use.

14. Internet Explorer 6 will automatically delete temporary files, but only if you tell it to. Start the browser, select Tools / Internet Options... and Advanced, go down to the Security area and check the box to Empty Temporary Internet Files folder when browser is closed.

15. XP comes with a free Network Activity Light, just in case you can't see the LEDs twinkle on your network card. Right click on My Network Places on the desktop, then select Properties. Right click on the description for your LAN or dial-up connection, select Properties, then check the Show icon in notification area when connected box. You'll now see a tiny network icon on the right of your task bar that glimmers nicely during network traffic.

16. The Start Menu can be leisurely when it decides to appear, but you can speed things along by changing the registry entry HKEY_CURRENT_USER/Control Panel/Desktop/MenuShowDelay from the default 400 to something a little snappier. Like 0.

17. You can rename loads of files at once in Windows Explorer. Highlight a set of files in a window, then right click on one and rename it. All the other files will be renamed to that name, with individual numbers in brackets to distinguish them. Also, in a folder you can arrange icons in alphabetised groups by View, Arrange Icon By... Show In Groups.

18. Windows Media Player will display the cover art for albums as it plays the tracks -- if it found the picture on the Internet when you copied the tracks from the CD. If it didn't, or if you have lots of pre-WMP music files, you can put your own copy of the cover art in the same directory as the tracks. Just call it folder.jpg and Windows Media Player will pick it up and display it.

19. Windows key + Break brings up the System Properties dialogue box; Windows key + D brings up the desktop; Windows key + Tab moves through the taskbar buttons.

20. The next release of Windows XP, codenamed Longhorn, is due out late next year or early 2003 and won't be much to write home about. The next big release is codenamed Blackcomb and will be out in 2003/2004
5/25/07

When you start to shut down Windows XP, it has to quit, or "kill," any live
applications or processes that are currently running. So close all applications first.
However, some applications and processes are always running in the background.
You can reduce the amount of time that Windows XP waits for those applications and
processes to close before Windows XP kills them.


1. Open registry editor[start>run>type regedit]
2. Navigate to HKEY_USERS\.DEFAULT\Control Panel\Desktop. Set the
WaitToKillAppTimeout and set the value to 1000.
Select the HungAppTimeout \newline value and set it to 1000 as well.
3. Navigate to HKEY_LOCAL_MACHINE\System\CurrentControlSet\Control.
Select the WaitToKillServiceTimeout value and set it to 10000.
4. Close the Registry Editor.

*Some internet explorer shortcuts

Go ‘Back’ to the previous page - Alt+Left Arrow

Go ‘Forward’ to the next page - Alt+Right Arrow

Add to Favorites on the current web page - Ctrl+D

Open the History folder - Ctrl+H

Open the Organize Favorites window - Ctrl+B

Lets you open a new web page - Ctrl+L

Open a new browser window - Ctrl+N

Reload the current page - Ctrl+R

Close the active Internet Explorer window - Ctrl+W

*Disable "My Recent Documents"

The Recent Docs menu can be easily disabled by editing the Registry. To do this go to
GO TO
START>RUN type regedit

Then go to his key

HKEY_CURRENT_USER\Software\Microsoft\ Windows\
CurrentVersion\Policies\Explorer.
Now in the right pane, create a new DWORD {to create this right click on the right pane & then new>DWORD}valueby the name: NoRecentDocsMenu and set it's value to 1.

Restart Explorer to save thechanges.

5/22/07

*To create a banner b4 the user log on

A pop a banner which can contain any message you want to display just before a user
is going to log on

For this first go to start>run>type regedit then ok & go to this key

HKEY_LOCAL_MACHINE\SOFTWARE\Microsoft\Windows\CurrentVersion\Polic
ies\System.

Now create a new string Value in the right pane named LegalNoticeCaption and enter
the value that you want to see in the Menu Bar. Now create yet another new string
value and name it LegalNoticeText. Modify it and insert the message you want to
display each time Windows boots. This can be effectively used to display the
company's private policy each time the user logs on to his NT box.

*display your fav name or caption on your internet explorer title bar


By default, Internet Explorer's title bar shows the name of the Web site you're
viewing, followed by "Microsoft Internet Explorer"--or in some cases, your
company's name or the name of the ISP that supplied the browser. To change the
repeating text in IE's title bar
To do this you have to go to start>run then type regedit then click OK
then select
HKEY_CURRENT_USER\Software\Microsoft\Internet Explorer\Main in the Registry
Editor
Then double-click the Window Title icon in the right pane.
(If you don't see this icon, right-click in the pane, choose New, String Value, type Window Title, and press.)
Type what you want to see on IE's title bar, or type nothing to show only
the site name. Note that the hyphen that normally separates the site name from the
page title will remain. When you relaunch Internet Explorer, you will see the change.

*wanna to speed up your start menu items

A simple Registry tweak can give speed up your start menu and sub-menus.
Go to start>run then type "regedit"(without quotes) and click

HKEY_CURRENT_USER\Control Panel\Desktop .

Double-click the MenuShowDelay icon on the right, and change 'Value data' from its
default of 400 (milliseconds) to something speedier, like 0. When you have finished,
press Enter.

5/21/07

*wanna know hw 2 increase your system perfomance

1. go "START"
2. open "RUN"
3. type "Regedit"
4. go to "HKEY_LOCAL_MACHINE".5>click on "SYSTEM".6>click on "CurrentControlSet".
7. click on "CONTROL".
8. click on "SessionManager".
9. click on "Memory Management".
10.u wil find key "DisablePagingExecutive".11>set that value "1"


i think this may increase your system perfomance

*download spiderman-3 screensaver


To download spiderman 3 screensaver just click on this link

*Wanna play ps2 games on your pc


*To make your PC a playstation


Here are the softwares and necessary tools to emulate PS2.U need -1) PC and PS2 DVD game
2) Get PCX2 from www.emulator-zone.com
3) Get the PS2 bios file from http://www.sendspace.com/file/r083iv password is "vaibhavdangwal" without quotes.
4) get the Ps1,Ps2 plugins from www.aldostools.com
5) Alcohol 120%.Get it from http://www.alcohol-soft.com/
Step 1
Extract PCX2 on Ur Harddisc.Extract Bios file in its Bios folder.Extract plugins in plugins folder.
Step2
Make image of PS2 DVD using Alcohol 120%.
Step 3
Load Image U created in virtual drive of Alcohol.
Step 4
Open PCX2 and go to configure.Select confighure CD/DVD plugin and set the disc drive to alcohol virtual drive.
Step 5
Run the emulator from RUN CD.Configure Ur PS2 and play Ur favourite game.

5/20/07

* make your XP genuie

*FOLLOW THESE STEPS TO MAKE YOUR XP GENUIE*
2 make your xp genuie u hav to download this keyfinder from
http://rapidshare.com/files/32332661/kf151.zip


1.RUN KEYFINDER.EXE
2.CLICK ON OPTIONS MENU AND THEN CLICK CHANGE WINDOWS KEY
3.IN THE BOX THAT APPEARS PUT HE WINDOWS GENUIE KEY
4.click change

WINDOWS XP proffessional genuie key
V2C47-MK7JD-3R89F-D2KXW-VPK3J


>>>>>>>>>eNjOy tHe Ultimate power of genuie version<<<<<<<<<<<<<
if you have any problem with this plse contact me....

download the songs of kisi din


DOWNLOAD ADNAN SAMI'S NEW ALBUM KISI DIN

http://mp3hungama.com/music/index.php?action=album&id=1426

DISPLAY THE WINDOWS SPLASH SCREEN WHILE LOADING

DISPLAY THE WINDOWS SPLASH SCREEN WHILE LOADING
While windows is loading usually you see the windows clouds splash screen,this can be disabled to show the backgroud DOS boot process
process
change the attributes for MSDOS.SYS so it is not read only it can found in the root directry of your c:\ drive open tht using notepad or your favourite text editor(not in MSword or othes wordpads)
change the value of 'Logo=' to 'logo=1' thats splash screen enabled
Changes will be take place in the next reboot

EDITING START UP AND SHUT DOWN SCREEN

EDITING START UP AND SHUT DOWN SCREEN
There are three files which make up the start up and shut down screen
LOGO.SYS:The start up screen usually located in your c:\directory
LOGOW.SYS:The please wait screen usually located in the C:WINDOWS directory
LOGOS.SYS-The "it is now safe to turn off your computer" located in the c:windows directory
These are standard 256 colours WINDOWS BITMAP images with dimensions 320(W)*400(h)
WARNING:Keep a backup copy of these three files before doing this
process
1.copy LOGOW.SYS and LOGOS.SYS into a temporary folder and rename the extensions as .BMP
2.Using your favourite graphics editing software,open the files and edit it with your own text and images
3.Once editing finished , save it and change their extensions as .SYS and copy them over the files in the windows directory
NOTE :Make sure that the edited page on the width 320(W)*400(h)

Twitter Delicious Facebook Digg Stumbleupon Favorites More

 
Design by Free WordPress Themes | Bloggerized by Lasantha - Premium Blogger Themes | Best CD Rates